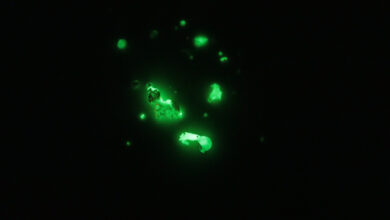


Matrix (1999)


Movie: Up (2009)


Movie: Hero (2002)
The Movie Iris project was something that I started working on during quarantine. I saw some cool visualizations on Reddit’s r/dataisbeautiful and was inspired to start working on the project. Some other users had already done something like this – and I wanted to try my hand at is as well. This repo is my take on turning movies into still art. Effectively taking raw movie frames, compressing them to their core colors, and visualizing the color schemes of a movie. I wanted to see how movies evolve, as well as how directors intended for different colors to be prevalent across different scenes. I wanted to make something artistic and visual, and I figured this would be a great opportunity to learn how to do some image processing, while making something that I’ll actually get to enjoy as well as share with friends and family!
P.S. Feel free to message me if you want me to do this to a video of yours!
This repo takes in a video (can be .mp4, .avi, .mkv), and visualizes the color themes present in the video as a barcode and as a circle. There are 2 outputs to this script: barcode.png and iris.png. The outputs and all of the actual frames in this script are .png as it is as lossless format. Important to note – this is not just for movies – any video can be used (TV show episode, first bike ride, travel video, etc.)
This project was written in Python, and uses 2 main libraries:
CV2PIL
-
This file takes 4 inputs:
- Height of the final barcode
- The name of the video
- The vidcap (filepath of the video)
- The frame count that we want to capture
-
The script creates a local folder to store all of the files that are going to be created
-
We divide the total amount of frames in the video by the desired frame_count, in order to figure out how many frames to skip for each frame we capture. We then capture the frames, skip by the correct amount, and capture again. We then save the newly created frames locally to the new folder we created. This interval allows us to capture the essence of the video.
-
We then increase the contrast slightly in each frame, in order to make more vibrant colors.
-
We take these new contrasted_frames and resize the images 3 times, finally reaching our desired size, which is
1 pixel widex1000 pixels highimage. -
We then take each frame, and effectively merge them together, creating a
6400 pixel widex1000 pixel highbarcode, where each pixel is 1 distinct frame from the video. -
We then run the
linear_to_circular.ipynbfile.
-
This file also takes 4 inputs:
- The name of the video
- Current working directory
- The final images working directory
- The name of the final barcode we created in the previous file.
However, we don’t need to pass these in, as they are imported from the previous file, and we can just continue with those variables.
-
The first thing we do is read in the barcode image that was made in
video_to_barcode.ipynb -
We then create a white stripe along the bottom of the image. This is so that when we transform the image to polar coordinates, the bottom of the image becomes the center, and we can get a nice white circle in the middle, to create that iris visualization.
-
The next thing we do is convert the barcode image to polar coordinates. There are multiple input arguments for the
warpPolarfunction:- src
- dsize
- center
- maxRadius
- flags
src:is effectively the source image we want to convert to polar coordinates – this should stay the same.dsize:is how large we want the output image to be — these measurements we’re a lot of trial and error on my part – you can tweak these as you see fit.center:is where we want the center of the image to be, relative to the dsize. This should not be changed, as it will dynamically update with the dsize_args parameter.maxRadius:is how large we want the circle to be — this was also a lot of trial and error to get a good fit for the image – this can be tweaked as well.flags:is how the warpPolar function knows how to modify the src. This should not be touched. -
Output the image.