It is December. That means annoying Christmas things are everywhere, including but not limited
to the annual programming semi-competition known as Advent of Code.
The problem with Advent of Code is that it is a waste of time. Most of the puzzles are in the
realm of either string processing (somewhat applicable to programming), logic puzzles (not
really applicable to most programming), or stupid gotchas in the input format (annoyingly, very
applicable to most programming). So to combat this a lot of people use Advent of Code as an
excuse to learn a new programming language that they wouldn’t otherwise have a reason to use.
In this spirit, I’ve decided to do Advent of Code 2024 in Rust, a language don’t I use that
often.
I do actually know Rust, but I never learned how to use it. I just started writing it because I
was born with an innate knowledge of the language, similar to how I know Java or Kotlin despite
never having learned them.
However, writing standard userland Rust on a system with a runtime is too easy; it’s like
writing a more annoying version of Java. So instead I will write it for an embedded system which
has no runtime, a limited amount of memory, and most importantly little to no existing ecosystem
for me to fall back on.
All the code for this project is available
in the repository.
Warning!
This post is long, verbose, and explains a lot about things that aren’t relevant because
this was written in tandem with developing the project and is meant to show everything I
learned on the way. There’s a lot of things here that might seem obvious to people who know
things about executables or embedded systems.If I wanted to do this fast, I could’ve just copied everything BlocksDS does, but I
deliberately avoided anything related to other Nintendo DS homebrew projects or SDKs as they
are focused on teaching you how to put all of the blocks together, but not how to actually
build the blocks yourself.
A quick overview of the Nintendo DS (Nitro)
As the title of this post states, I’m going to be writing it on the Nintendo DS (the original
edition). Whilst there is a fair bit of interest in the “embedded gaming” scene of its
predecessor systems (the Game Boy and Game Boy Advance), as well as its successor system the
3DS, the homebrew and emulation scene for the DS itself is relatively limited due to the more
esoteric design of the system.
The DS’s codename was “Nitro”, hence the model number NTR-001. Its successor system, the DSi,
has the codename of “Twilight” with the model number TWL-001. I’ll refer to the system
exclusively using its codename, as Nitro sounds cooler and is easier to refer to than “Nintendo
DS” is.
If you’re interested in a more comprehensive overview of the system, I recommend this
excellent article
by Rodrigo Copetti.
The Nitro uses two processors; an ARM946E-S running at 67MHz (in practice, less) which uses the
ARM v5 instruction set, and an ARM7TDMI running at 33MHz which uses the ARM v4 instruction set.
In fact, the ARM7 CPU is identical the one inside of the Game Boy Advance, meaning that when
you play a GBA game on the Nitro it executes a small amount of code to lock out the main CPU
and sets up the secondary processor into the same setup as the original console.The Twilight includes the same ARM7 CPU, just without the GBA slot. The 3DS/CTR also
includes this CPU alongside its other two CPUs, which is used to run DS(i) games (and, when
hacked, GBA games). Every Nintendo handheld up to the 3DS contains a GameBoy inside it!
Unlike what you might expect, the two processors have different roles; the ARM9 processor is
where the majority – if not all – of the game’s code exists, and the ARM7 processor acts
strictly as a coprocessor that controls interaction with the system’s I/O. The two processors
talk to each-other using a FIFO interface mapped in both processors’ memory space. It’s hard to
get an actual source on this, but various comments spread across the internet talk about how
most code on the ARM7 was heavily restricted by Nintendo, thus most of the power of the
secondary processor goes entirely unused.
This works out great for me, as it means I can focus only on writing code to run on the ARM9,
and let the ARM7 spin idly.
Preparations
I know a little bit about how the DS works from reverse-engineering a game over the last two
years or so; but beyond that everything here is gleamed from a few sources:
-
GBATEK which is a very large and very
detailed technical reference on everything there is to know about the GameBoy Advance as
well as the Nitro/Twilight. -
The aforementioned decompiled game,
Infinite Space (2009). It’s a
pretty decent JRPG albeit unbelievably difficult, and is worth playing with cheats on a few
times. -
The official ARM v5 ARM Architecture Reference Manual, (ARM v5 ARM) available from the A RM
website.
In addition, I set up an ARM cross-compiler using
Crossdev, compiling only binutils and GDB.
Getting a working ROM
There’s three major tasks to do to finish this project:
- Get something that even boots. This is 90% of the effort.
- Solve Advent of Code. This is also 90% of the effort.
- Actually display something to the screen. This is also 90% of the effort.
The sample program
First, I need a sample program to actually run on the Nitro. Let’s just write something
that loops forever, helpfully annotated:
#![no_std]   // Obviously, we don't have a runtime.
#![no_main]  // We use an extern "C" main instead of a Rust main.
#![allow(clippy::empty_loop)]  // Otherwise clippy gets mad at our infinite loop.

// This is an empty panic handler as we don't have any infrastructure to actually... well, handle
// panics in any form.
//
// On platforms with a runtime, ``std`` provides lots of helpful code to unwind all of the code
// and print a stacktrace, but we don't have that, so instead when ``panic!()`` (or, rather,
// ``core::panicking::panic``) is called, it calls this function instead.
//
// See https://fractalfir.github.io/generated_html/rustc_codegen_clr_v0_2_1.html for the
// nitty-gritty details.
#[panic_handler]
fn _handle_panic(_: &core::panic::PanicInfo) -> ! {
    loop {}
}

// Unsafe attributes are a new feature in Rust 2024, and means "you now need to prefix this
// attribute with unsafe".
//
// Without ``no_mangle``, this function would get optimised out (as nothing calls it), and even
// if it didn't, it would be given an unintelligible name so that it wouldn't conflict with
// functions from other packages called ``_start`` (as unwise as it would be to use that name).
//
// This also needs to be named ``_start``, or else the linker just won't output anything. More on
// that later!
#[unsafe(no_mangle)]
extern "C" fn _start() -> ! {
    loop {}
}
Next, Cargo/Rust needs to be configured to build for Nitro. The compiler triplet for ARM9 CPUs
like the Nitro’s is armv5te-none-eabi; i.e., ARM version 5, no OS (baremetal),
using the embedded ABI. I could do cargo build --target=armv5te-none-eabi every
time, but Cargo has the ability to do this automatically with the confusingly named
.cargo/config.toml file:
[build]
target = "armv5te-none-eabi"
Running cargo build now will grant me an error:
$ cargo build
   Compiling aocnds v25.0.0 (/home/lura/dev/misc/aocnds)
error[E0463]: can't find crate for `core`
  |
  = note: the `armv5te-none-eabi` target may not be installed
  = help: consider downloading the target with `rustup target add armv5te-none-eabi`
  = help: consider building the standard library from source with `cargo build -Zbuild-std`
The help text in this case is useless, as armv5te-none-eabi is a
Tier 3
target and doesn’t come with any pre-built standard library packages. Instead, I need to use the
build-std
feature of Cargo to compile the core (and, later, alloc) packages for
my target.
This feature is (still) unstable and requires a nightly compiler + cargo version to use.
Now with this, I can build my program with a regular
cargo build --release, which spits out a nice, 4440 byte
aocnds executable (after stripping).
Wait, is that it?
Okay, I don’t have a ROM. But I do have a nice blob of ARM9 code that I can turn into a ROM,
right?
# Just do a straight up memory copy with objcopy...
$ arm-none-eabi-objcopy -O binary aocnds arm9.bin
# Then disassemble it with objdump:
$ arm-none-eabi-objdump -D -b binary -marmv5te arm9.bin

arm9.bin:     file format binary


Disassembly of section .data:

00000000 <.data>:
       0:	00010010 	andeq	r0, r1, r0, lsl r0
       4:	00000001 	andeq	r0, r0, r1
       8:	00010010 	andeq	r0, r1, r0, lsl r0
       c:	00000001 	andeq	r0, r0, r1
	...
   10010:	eaffffff 	b	0x10014
   10014:	eafffffe 	b	0x10014
If you don’t know how to read a disassembly, there’s three columns: the address of
the instruction, the raw bytes of the instruction, and the assembly
for the instruction.Objdump and other disassemblers don’t discriminate between actual ARM machine code and
random data included by the compiler and linker. Thanks to a quirk of the way the ARM
instruction encoding was designed, most junk instructions end up being decoded as valid
instructions, albeit nonsensical and usually nonfunctional.
There’s some junk at the beginning of the file, and then finally the actual code begins at
offset 0x10010. By using readelf and objdump on the file, we can see
that the 16 bytes of junk at the start is the same as the .ARM.exidx section:
Disassembly of section .ARM.exidx:

000100d4 <.ARM.exidx>:
   100d4:       00010010        andeq   r0, r1, r0, lsl r0
   100d8:       00000001        andeq   r0, r0, r1
   100dc:       00010010        andeq   r0, r1, r0, lsl r0
   100e0:       00000001        andeq   r0, r0, r1
The 0x10010 bytes of padding before the program text and after the ARM section is
because the second header is loaded at a virtual address 0x10010 bytes later.
Program Headers:
  Type           Offset   VirtAddr   PhysAddr   FileSiz MemSiz  Flg Align
  PHDR           0x000034 0x00010034 0x00010034 0x000a0 0x000a0 R   0x4
  LOAD           0x000000 0x00010000 0x00010000 0x000e4 0x000e4 R   0x10000
  LOAD           0x0000e4 0x000200e4 0x000200e4 0x00008 0x00008 R E 0x10000
  GNU_STACK      0x000000 0x00000000 0x00000000 0x00000 0x00000 RW  0
  ARM_EXIDX      0x0000d4 0x000100d4 0x000100d4 0x00010 0x00010 R   0x4
The code at 0x10010 is a Branch instruction to
0x10014, which is then a branch instruction to itself. Because the
b instruction with a constant is always a relative jump,
eafffffe means “jump zero bytes forwards”; or, PC := PC which matches
the Rust code. Great!
The outputted ARM9 blob can be packed into a ROM using
ndstool for now. Borrowing an
ARM7 from a game, I can pack my blob like so:
$ ndstool -c rom.nds -9 arm9.bin -7 ~/aur/emulation/roms/nds/arm7-is.bin
$ ndstool -i rom.nds
...
0x20    ARM9 ROM offset                 0x200
0x24    ARM9 entry address              0x2000000
0x28    ARM9 RAM address                0x2000000
0x2C    ARM9 code size                  0x10018
...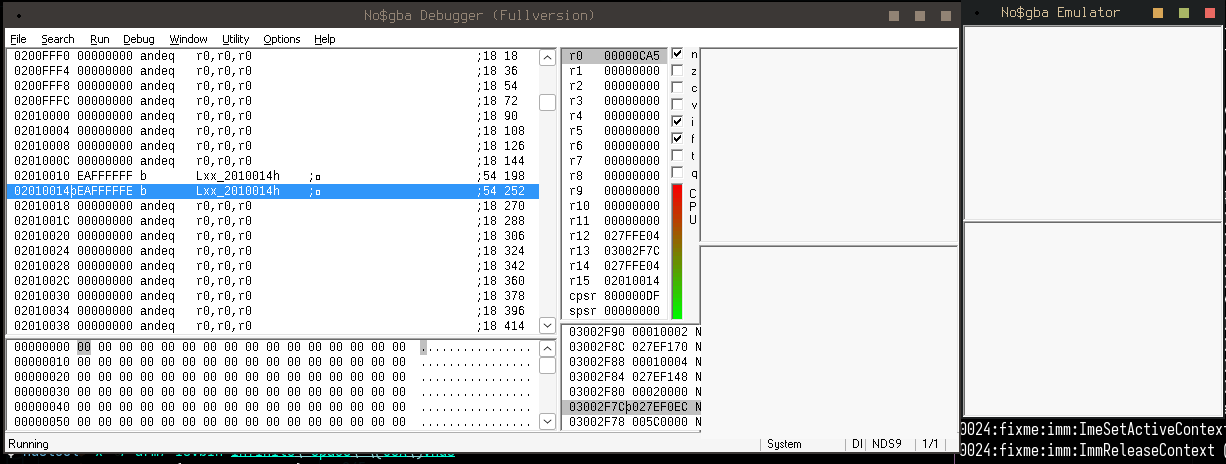
For the moment I’ll use NO$GBA debug to load the rom; I’ll use a better emulator with a GDB stub
for debugging later. After hitting run, the emulated ARM9 skips past the junk at the start of
the file (thankfully, that junk all decodes to andeq instructions, which don’t do
anything) until it reaches the infinite loop. Success! I have built my first rust binary for
Nitro, and I didn’t really have to do anything!
No, that’s not it
Unfortunately, I got lucky here. This program actually has some immediate problems:
-
.bsshas not been zeroed, which is UB. At least I don’t have any global
variables. - The stack pointer is set to a junk value, not real memory.
Oh, but there’s another really important one:
- The code is not running where it expects to!
Nitro has, essentially, three main memory areas:
-
The Instruction Tightly Coupled Memory (ITCM), which is mapped at 0x0 and mirrored at
0x01000000(but most commercial Nitro software uses the mirror at
0x01ff8000). This is 32KiB. -
The Data Tightly Coupled Memory (DOCM), which is movable throughout the entire memory
space but in practice is usually mapped at0x027e0000. This is only 16KiB.
Most commercial Nitro software uses this for the stack. -
Main memory, which is mapped at
0x02000000. This is 4MiB on retail units
and 8MiB on debug units.
There’s also the “shared RAM”, which is 32KiB in total and can be allocated to either the ARM7
or the ARM9, either half and half or all to one. The ARM7 is crying out for memory as it only
has 64KiB for itself, so this can all be allocated to the ARM7 and ignored. I believe all
official Nitro games do this.
At boot, the software running on the cartridge is copied to the very bottom of main memory, and
the BIOS jumps to the entrypoint specified by the cart header. With my binary, the entrypoint
was set to be the very first address of main memory (the gigantic stack of empty
andeqs) with the _start function trailing it. The more pressing manner
is that the code in _start was built and linked with the assumption that it would
be loaded at 0x200e4, which it very much is not.
A quick terminology lesson here, as some of those terms might not be familiar.
ELF terminology
.dataand.bssare both sections in the final
executable. Sections are what they sound like; literally a part of an executable file
that is loaded by a program loader into memory when a program starts. Of course, my
program doesn’t have a program loader yet; it’s just a raw blob of ARM9
instructions interlaced with the other sections.The
.data(and,.rodata) section contains
global variables that have been explicitly initialised; in Rust, examples of
this would be static globals, like so:#[unsafe(no_mangle)] pub static BLOB: &str = "暁山瑞希";This data is stored directly in the
.rodatasection of the file, and an
entry in the Program Headers of the elf file is emitted to tell the dynamic loader to
load these globals at the right spot in virtual memory.The
.bsssection is used for uninitialised global variables and is
by convention set to all zeroes. To avoid bloating a file with emptiness the binary
contains only the length of the section which will be allocated by the program loader as
an empty block on startup. Again, this is something my program doesn’t have and will
need to set up manually.Also, for good measure,
.textis the raw machine code for the program, also
referred to as “program text” sometimes.
If all of the
binstructions are relative, what’s the problem with the code
thinking it’s loaded somewhere else?Deeper explanation
Let’s take this bit of code as an example:
#[instruction_set(arm::t32)] fn other() -> u8 { 1 } #[unsafe(no_mangle)] #[instruction_set(arm::a32)] extern "C" fn _start() -> ! { let _ = other(); loop {} }Notice that the function
otheris using the Thumb instruction set and the
function_startis using the Arm32 instruction set. This is linked to load
at the start of memory like before, so let’s look at the disassembly for it:Disassembly of section .text: # Mangled name of "other" 00008000 <_ZN6aocnds5other17h6d2efad51ed937f1E>: 8000: 2001 movs r0, #1 8002: 4770 bx lr 00008004 <_start>: 8004: eb000001 bl 8010 <___ZN6aocnds5other17h6d2efad51ed937f1E_from_arm> 8008: eaffffff b 800c <_start+0x8> 800c: eafffffe b 800c <_start+0x8> # Trampoline for ARM code to Thumb code 00008010 <___ZN6aocnds5other17h6d2efad51ed937f1E_from_arm>: 8010: e59fc000 ldr ip, [pc] @ 8018 <___ZN6aocnds5other17h6d2efad51ed937f1E_from_arm+0x8> 8014: e12fff1c bx ip 8018: 00008001 andeq r8, r0, r1 801c: 00000000 andeq r0, r0, r0The linker has inserted a function trampoline to switch from ARM to Thumb mode. The
Branch with Exchange instruction only takes an absolute register argument, unlike the
normal branch with link instruction, so the assembled code uses the IP (R12) register.
The IP register is loaded with a constant stored just after the function body –
0x00008001, the absolute address of the actualotherfunction in memory.Since the program is loaded at 0x02000000 this will jump straight into unmapped memory
and cause the processor to fault.
The first linker script
I need to somehow tell the compiler and my code to do the following:
- Compile with the assumption the code will be loaded and running at 0x02000000.
-
Arrange the
.data/.rodatasection with the assumption it’ll be
loaded after 0x02000000 too. -
Set up a stack pointer that points into the Data Tightly Coupled Memory section so that I
can actually use local variables.
The first two can be done using a linker script. The misleadingly named linker script
is a configuration file for the linker which tells it where to put the sections found in the
intermediate files produced by the compiler into the final binary file.
The average programmer will likely never interact with a non-default linker script in their
life. Of the ones that do, only a tiny percentage will ever write their own linker script.
Thankfully the programmers that do know how to write linker scripts have
documented it.
/* Standard cruft at the beginning of the file. I don't know what omitting this does,
so let's not do that. */
OUTPUT_FORMAT("elf32-littlearm")
OUTPUT_ARCH(arm)
ENTRY(_start)
/*
* The memory layout of the DS is pretty simple; for now, we'll just define the main memory.
* It's a nice block of 4MB that's Readable, Writable, and eXecutable.
*/
MEMORY {
main_ram (rwx) : ORIGIN = 0x02000000, LENGTH = 4M
}
To actually use this file, I need to add another option to my .cargo/config.toml to
tell the linker what script to use:
[target.armv5te-none-eabi]
rustflags = [
# The default ``rust-lld`` linker kinda works, but it doesn't support some linker script options
# in weird and obscure ways. I'll just use my cross-compiler linker instead.
"-Clinker=arm-none-eabi-ld",
"-Clink-arg=-Tlinker.ld"
]I was curious to see if this would Just Work, so I built the ELF file and objdump’d it:
Disassembly of section .text:
02010010 <_start>:
2010010: eaffffff b 2010014 <_start+0x4>
2010014: eafffffe b 2010014 <_start+0x4>
Aha! The 0x10000 bytes of junk is still there at the start, but now the code is correctly being
loaded into Nitro’s main memory. Not only that but the entrypoint is correct too:
$ arm-none-eabi-readelf -h aocnds
ELF Header:
Magic: 7f 45 4c 46 01 01 01 00 00 00 00 00 00 00 00 00
Class: ELF32
Data: 2's complement, little endian
Version: 1 (current)
OS/ABI: UNIX - System V
ABI Version: 0
Type: EXEC (Executable file)
Machine: ARM
Version: 0x1
Entry point address: 0x2010010
If I compile a slightly modified program that calls a function with a
&'static str variable, I can also verify that it’s using the right addresses
for .rodata:
#[unsafe(no_mangle)]
pub static BLOB: &str = "暁山瑞希";
// has to 1) exist 2) take the arg or the linker GCs us :(
fn other(_: &str) {
// bx lr
}
#[unsafe(no_mangle)]
extern "C" fn _start() -> ! {
other(BLOB);
loop {}
}Disassembly of section .rodata:
02000010 :
2000010: e5819ae6 str r9, [r1, #2790] @ 0xae6
2000014: 91e7b1b1 strhls fp, [r7, #17]!
2000018: 8cb8e59e ldchi 5, cr14, [r8], #632 @ 0x278
0200001c :
200001c: 02000010 andeq r0, r0, #16
2000020: 0000000c andeq r0, r0, ip
Disassembly of section .text:
02010024 <_ZN6aocnds5other17hd0540aae0727baf3E>:
2010024: e24dd008 sub sp, sp, #8
2010028: e58d0000 str r0, [sp]
201002c: e58d1004 str r1, [sp, #4]
2010030: e28dd008 add sp, sp, #8
2010034: e12fff1e bx lr
02010038 <_start>:
2010038: e59f1010 ldr r1, [pc, #16] @ 2010050 <_start+0x18>
201003c: e5910000 ldr r0, [r1]
2010040: e5911004 ldr r1, [r1, #4]
2010044: ebfffff6 bl 2010024 <_ZN6aocnds5other17hd0540aae0727baf3E>
2010048: eaffffff b 201004c <_start+0x14>
201004c: eafffffe b 201004c <_start+0x14>
2010050: 0200001c andeq r0, r0, #28 <-- BLOB <-- BLOB-0xc
The linker is placing the data in the right memory section and the reference after the body of
_start is pointing to main memory. Success!
The C Runtime
I’m still in no man’s land here; without a stack pointer, I can’t use local variables or call
other functions as the compiler automatically emits instructions to manipulate the stack pointer
on function entry and exit.
The stack is an area of memory where local variables are stored. It’s called a stack because
it grows in a first-in last-out manner. When a function needs to use a local variable, it
allocates some space in the stack at the address of stack pointer – one of the
processor registers specifically designated for this purpose – then moves it downwards by
the amount of space that variable takes. That way, every local variable in a function has
its own memory address automatically assigned.The stack is also used to preserve the state of the processor registers from a previous
function when calling a function. The number of registers preserved varies depending on
something known as a calling convention; for 32-bit ARM in the embedded ABI, this is
registers four through eleven, as well as the Link register which is used to return from a
function to the previous one.When a function exits, it no longer needs the space for the local variables, so the stack
pointer is reset back to where it was before the function was called, allowing the previous
function to reuse that memory for other local variables or other function calls. The
compiler does this automatically for me in assembly known as the function prologues and
epilogues. Without a valid stack pointer, none of the operations described here are
valid, and will cause the processor to fault.
These instructions on entry/exit are known as the function prologue and epilogue, and are
related to avoiding clobbering registers used by previous functions. You can find more
information about the 32-bit ARM calling convention
here).
Before every single program is a small stub of hand-written assembly known as the
crt, which stands for “C Runtime”. This is also a misleading name, as it is neither
a runtime nor exclusive to the C programming language. On Nitro, this has a few things it needs
to do before jumping into the managed (i.e. my Rust) code:
- Set up the stack pointer
- Set up Coprocessor 15 for memory protection
- Zero out a memory area for the BSS segment
- Finally, jump into the high-level main function.
If you don’t know assembly or anything about it; that’s okay. I didn’t either until I
started this. Sure, I could read some ARM assembly, but writing it is a whole
different beast. Luckily it’s a very nice instruction set that is easy to understand.
Before I dive straight into writing all of this, let’s get the infrastructure for the assembly
working first. It’s all going to go into a file named start.s in src, and can be
included in the build process with the global_asm! macro, like so:
global_asm!(include_str!("start.s"));
I’ll just write a basic asm file that jumps straight to the Rust main function to make sure it
builds properly:
// Put it in the ``.text`` section, i.e. where all the functions are.
.section ".text._start"
// Export it globally so the linker can see it.
.global _start

_start:
    // Branch relative to the label (function) called main.
    b main
I’ll also go back and rename the Rust function from _start to main so
that it gets picked up. Dumping the executable shows that it is indeed included in my build:
Disassembly of section .text:

02010010 <_start>:
 2010010:       eaffffff        b       2010014

02010014 :
 2010014:       eaffffff        b       2010018
 2010018:       eafffffe        b       2010018
A real linker script
Up until now, I’ve been coasting along on what is essentially a bunch of heuristics from the
linker to put all of the sections in the right place. This mostly works, but let’s see
what happens if I add a region for the ITCM to the memory map in the linker script. The ITCM is
officially mapped starting at 0x0, but most official software pretends it’s mapped
at 0x01000000. Because it’s mirrored every 0x8000 bytes, most official
software seems to pretend it actually starts at 0x01ff8000, which is
0x8000 bytes before main memory.
MEMORY {
+   itcm (rwx)      : ORIGIN = 0x01ff8000, LENGTH = 32K
    main_ram (rwx)  : ORIGIN = 0x02000000, LENGTH = 4M
+   dtcm (rw)       : ORIGIN = 0x027e0000, LENGTH = 16K
}
I could just not add it to the linker, but eventually I want to move some of my code into the
ITCM as it’s significantly faster to fetch instructions from the ITCM than from main memory.
Attempting to compile with this linker script will result in an immediate error because the ARM
unwind table doesn’t fit into 32KiB:
  = note: rust-lld: error: section '.ARM.exidx' will not fit in region 'itcm': overflowed by 32784 bytes
          rust-lld: error: section '.text' will not fit in region 'itcm': overflowed by 98372 bytes
This is because the heuristics the linker uses is to put all sections in the first memory
segment it finds; in this case, it’s the ITCM segment. I don’t want unwind tables or the first
half of my program text in the ITCM anyway!
To solve this, I need to actually start defining some sections in the linker script. First, I’m
going to make it so that Cargo will correctly rebuild the project if the script changes, rather
than going “yup, looks good to me!”, by creating a `build.rs` file in the root of the project:
pub fn main() {
    println!("cargo::rerun-if-changed=linker.ld");
}
Next, let’s define some code sections in a… SECTIONS block:
SECTIONS {
    /* The CRT always needs to be in main memory. Let's put it at the start for good measure. */
    .crt : ALIGN(4) { *(.crt); *(.crt.*) } > main_ram =0x39

    /* The text section should be in main memory. Things that will go into the ITCM can be put
       there explicitly. */
    .text : ALIGN(4) { *(.text); *(.text.*) } > main_ram =0x39
    /* The data section should also be in RAM. DTCM variables can be placed there explicitly. */
    .data : ALIGN(4) { *(.data); *(.data.*) } > main_ram =0x39
    .rodata : ALIGN(4) { *(.rodata); *(.rodata.*); } > main_ram =0x39
    /* The BSS section doesn't really... exist, but we need to allocate some space for it anyway. */
    .bss : ALIGN(4) { KEEP(*(.bss)); KEEP(*(.bss.*)); } > main_ram

    /* Make sure the start of the heap is properly aligned. */
    . = ALIGN(4);
    __text_end = .;

    /* Let's get rid of anything we haven't explicitly specified. This includes some debugging
       info for now. */
    /DISCARD/ : { * }
}
As the comments show, this forces the crt assembly to be in main memory and at the
very start of the code, then the .text section after, and finally the
.(ro)data sections. All of these sections have their unused bytes filled with a
fixed 0x39 (e.g. the trailing, unaligned bytes for global data or THUMB
instructions). The .bss section doesn’t exist in the binary, but I need to mark it
in the linker script so that the code knows where to zero it out at runtime.
Finally, I can define some “variables” which will be exported to the final code:
__bss_start = ADDR(.bss);
__bss_end = ADDR(.bss) + SIZEOF(.bss);
With the BSS labels defined, I can write some assembly to zero the section out:
// R0: value
// R1: ptr to start
// R2: size
_ASM_primitive_memset:
    // R12 (end) = start + size
    add r12, r1, r2
.L0:
    // Compare current pointer to end
    cmp r1, r12
    // Store multiple registers, increment address, only run if R1 < R12
    // *R1 = R0, R1 += 4
    // Also, the double braces are because this is being compiled with ``global_asm!()``, and single
    // braces means it would think it's a parameter and flip out at me for not providing an ``R0``
    // parameter.
    // Doesn't clear the condition bits so...
    stmialt r1!, {{R0}}
    // ... jump back if the condition still matches
    blt .L0
    // Return
    bx lr

_start:
    // Clear BSS
    ldr r2, =__bss_size
    ldr r1, =__bss_start
    mov r0, #0
    bl _ASM_primitive_memset

    // For future-proofing, we do a branch-with-exchange in case ``main`` ends up as a thumb
    // function.
    ldr r0, =main
    bx r0
The rest of the CRT
With a working linker script and my memory sections actively defined in the linker script, I can
start filling in the rest of the CRT. First, I disable interrupts and wait for vertical sync:
_start:
    // The IME is at address 0x4000208, and is a 32-bit register.
    // The only bit in it that matters is bit zero, which acts as the enable bit.
    // 1 = interrupts controlled by IE
    // 0 = interrupts forcibly disabled.
    //
    // The ``mov`` instruction with an immediate can only operate on any 8-bit value that is shifted
    // by an even power of two, which 0x04000208 is not. 0x04000000 (the base address for I/O
    // registers) is, so that's loaded into register zero. Then, exploiting the fact that the
    // LSB of 0x04000000 is 0, we store that into IME and the upper bits are ignored.

    mov r0, #0x04000000
    str r0, [r0, #0x208]

    // Wait for vertical sync.
    // Note: The syntax ``.L`` signifies a local label, which isn't exported as a symbol
    // in the final compiled object.
.Lvsync:
    // Load half-word at REG_DISP_VCOUNT. R0 was already the base of the I/O registers, so we
    // can just add 0x6 to it to load it into R1.
    ldrh r1, [r0, #0x6]
    // Compare to 0x0 and set the comparison flag.
    cmp r1, #0
    // Branch if not equal back to the VSYNC label.
    bne .Lvsync
Next, I set up my stack pointers. I want it to be in the DTCM, as that is significantly faster
than main memory. As eventually I’ll want to copy things into the DTCM from main memory, I’ll
define some variables in the linker script:
__dtcm_region_start = ORIGIN(dtcm);
__dtcm_region_end = ORIGIN(dtcm) + LENGTH(dtcm) - 4;
Now, I’ll finally give myself a frame pointer – or, in fact, three frame pointers; one
for each mode (Supervisor, IRQ, and System).
The vast majority of CPUs ever made have a concept of special modes; these are sometimes
called privilege modes, or rings, and are normally used to protect the kernel from user
software and userland software from other userland software. Each mode has its own
set of registers and state that is isolated from the other modes.Being that this is a game console – and an old, low-powered one at that – there’s no need
for this protection, so the modes are used primarily to separate the stacks and registers
when doing things like processing exceptions or interrupts.
Trivia!
On x86 (but not AMD64), there are four rings, numbered zero through three. User code
typically runs in Ring 3 and kernel code typically runs in Ring 0, with Ring 1 and 2 unused.
Back in the day, OS/2 used Ring 2 for device drivers, which makes emulating/virtualising it
a bit harder as one would have to support the middle rings.
More trivia!
ARM actually supports seven modes; in addition to those four, there’s also User
mode, FIQ mode, Abort mode, and… Undefined mode. I have no reason for User mode as there’s
no end-user programs (or even an MMU), and the other four modes are treated identically by
the BIOS.
To set the frame pointers, I need to switch into every mode and assign a value to the register.
The mode is set by the lower four bits of the CPSR (Current Program Status Register), and all
the other bits can safely be set to zero without issue. The offsets from the DTCM are calculated
in the linker script rather than the assembly file as they are known at compile time:
__stack_start_irq = __dtcm_region_end - 0x100;
__stack_start_svc = __stack_start_irq - 0x100;
__stack_start_sys = __stack_start_sys - 0x100;
Then, it’s just a few repeated instructions to change modes:
// Stack setup for every mode
// 0b10010 == 0x12, IRQ mode
mov r0, #0x12
msr cpsr, r0
ldr sp, =__stack_start_irq

// 0b10011 == 0x13, Supervisor mode
mov r0, #0x13
msr cpsr, r0
ldr sp, =__stack_start_svc

// 0b11111 == 0x1f, System mode
mov r0, #0x1f
msr cpsr, r0
ldr sp, =__stack_start_sys
With the stack pointers now valid and the .bss zeroed, I now have a
valid Rust program that can be built and linked.
Coprocessor 15
Coprocessor 15 (also known as the System Control coprocessor) is a special processor built-in to
the ARM9 (and ARM7) chips that controls things mostly relating to memory layouts and memory
protection. CP15 has sixteen registers, with the most interesting ones being:
-
Registers 2, 5, 6, 8, 10, and 13 control the memory protection subsystem, which is an
alternative to the memory management unit subsystem (which the ARM9 doesn’t have). This
subsystem mostly pertains to caching and raising CPU exceptions on out-of-bounds reads. -
Registers 7 and 9 control the cache and write buffers, as well as the tightly coupled
memory locations.
This is fiddly and annoying (my decompiled game has 45 (!) instructions to set it up)… so I’m
simply going to blindly steal what said game does. I’ve helpfully commented everything too, so
that future generations can understand it easier.
setup_coprocessor function (it’s really long!)
setup_coprocessor:
    // The creatively named MCR and MRC stand for "Move Coprocessor to Register" and
    // "Move Register to Coprocessor", respectively. The names are misleading; it really means
    // "do coprocessor command".

    // C1/C0/0 = System control, copy the definition into R0
    mrc p15, 0x0, r0, cr1, cr0, 0x0

    // load constant control value
    // this (temporarrily) disables the protection unit, the DTCM and ITCM, and disables
    // caching for them
    ldr r1, =0x000F90053
    // BIC = Rd AND (NOT Rn)
    // clear any set bits in R0 that are set in R1, leave the rest alone
    bic r0, r0, r1
    // write it back
    mcr p15, 0x0, r0, cr1, cr0, 0x0

    // Disable caches for both TCMs (?)
    // C7,C5,0   0    Yes  Invalidate Entire Instruction Cache
    // C7,C6,0   0    Yes  Invalidate Entire Data Cache
    mov r0, #0
    mcr p15, 0, r0, c7, c5, 0
    mcr p15, 0, r0, c7, c6, 0
    // C7,C10,4  0    -    Drain Write Buffer
    mcr p15, 0, r0, c7, c10, 4

    // == Memory Protection == //
    // The protection regions are almost identical to the ones on GBATEK, which are in themselves
    // identical to the ones setup by the CRT of the game I've decompiled.
    //
    // Control register C6 defines the region, C0-C7 all define a specific subregion.
    // Bit   0: 1 = enable protection, 0 = disable protection
    // Bit 1-5: 2 SHL value = region size
    // Bit 6-11: reserved
    // Bit 12-31: Region address * 4096
    //
    // The official ARM docs marks sizees less than 0b01011 as unpredictable, so the base unit is
    // in 4KB blocks?
    //
    // "The address of the first byte is required to be a multiple of the region size."

    // Protection region 0: 0x04000000, 64MiB (i.e. up to 0x8000000)
    // This is the I/O registers all the way up to the end of the OAM!
    ldr r0, =(0x04000000 | 0x33)
    mcr p15, 0, r0, c6, c0, 0

    // Protection region 1: 0x02000000, 4MiB
    // The compiled game I'm looking at has it incorrectly set to 8MiB. I guess the SDK always
    // sets it that high? This is main memory.
    ldr r0, =(0x02000000 | 0x2b)
    mcr p15, 0, r0, c6, c1, 0

    // Protection region 2: 0x027e0000, 128KiB (what?)
    // GBATEK: Region 2 and 7 are not understood?
    // Not going to set this. All zeroes to disable memory protection.
    mov r0, 0
    mcr p15, 0, r0, c6, c2, 0

    // Protection region 3: 0x08000000, 128MiB
    // GBATEK: GBA Slot should be max 32MB+64KB, rounded up to 64MB, no idea why it is 128MB?
    ldr r0, =(0x08000000 | 0x35)
    mcr p15, 0, r0, c6, c3, 0

    // Protection region 4: 0x027e0000, 16KiB
    // This is the DTCM.
    ldr r0, =__dtcm_region_start
    orr r0, r0, #0x1b
    mcr p15, 0, r0, c6, c4, 0

    // Protection region 5: 0x01000000, 32KiB
    // ITCM. Thanks to mirroring, this repeats itself every 32KiB.
    ldr r0, =__itcm_region_start
    orr r0, r0, #0x1d
    mcr p15, 0, r0, c6, c5, 0

    // Protection region 6: 0xFFFF0000, 32KiB.
    // This is where the BIOS is mapped.
    ldr r0, =(0xFFFF0000 | 0x1d)
    mcr p15, 0, r0, c6, c6, 0

    // Protection region 7: 0x027FF000, 4KiB.
    // GBATEK says "shared work". I do wonder where it got that name from.
    //
    // The actual shared WRAM area is at the 0x03... addresses.
    // So... let's set it there.
    // Protection region 7: 0x037F8000, 32KiB.
    ldr r0, =__shram_region_start
    orr r0, r0, #0x1d
    mcr p15, 0, r0, c6, c7, 0

    // Protection region 2: 0x027FF00, 4KiB.
    // This is BIOS ram, see NDS BIOS RAM usage in GBATEK. Only realised this when looking through
    // addresses.
    ldr r0, =(0x027FF00 | 0x17)
    mcr p15, 0, r0, c6, c2, 0

    // == Tightly Coupled Memory == //
    // C9, C1 controls the TCM Region.
    //
    // The ARM manual states "Prior to ARMv6 it is IMPLEMENTATION DEFINED how TCMs are supported,
    // "though generally this is through a System Control Coprocessor interface.""
    //
    // ITCM is fixed, so just set the size to 32MiB so it covers the entire first part of memory
    // space. It'll get mirrored apparently.
    // Table B7-2: 32MiB is 0b10000 (<< 1), 16KiB is 0b00101 (<< 1).
    mov r0, 0x20
    mcr p15, 0, r0, c9, c1, 1

    // DTCM is movable, so load it at the right address and set its size to 16KiB.
    ldr r0, =__dtcm_region_start
    orr r0, r0, 0xa
    mcr p15, 0, r0, c9, c1, 0

    // == Protection Unit, Pt 2 == //
    // Register C2,C0 controls data caching and it's a bitfield for every region that needs caches.
    // 0x1 = instructions, 0x0 = data
    //
    // The only regions that needs caching is main memory, which is region 1, and the BIOS, which
    // is region 6. (The bitfield starts from the LSB.)
    mov r0, #0b01000010
    mcr p15, 0, r0, c2, c0, 0
    mcr p15, 0, r0, c2, c0, 1

    // C3,C0,0 is... write-bufferability? This is too far into the details of CPUs for me.
    // Just do what the official CRT does, which is region 1 (main memory).
    mov r0, #0b00000010
    mcr p15, 0, r0, c3, c0, 0

    // C5,C0 controls the permissions for the various memory protection regions. Immediate
    // value 2 and 3 control *extended* permissions, which give 4 bits per region with up to
    // six values. 2 = Data/Unified, 3 = Instruction. Immediate value 0 and 1 control basic
    // permissions, with two bits per region.
    //
    // We're just going to fill this with 0b11 for all eight regions as constructing the individual
    // permission bits is fiddly and not really needed.
    ldr r0, =0xffff
    mcr p15, 0, r0, c5, c0, 0
    mcr p15, 0, r0, c5, c0, 1

    // Re-enable ITCM, DTCM, caches, and protection unit.
    mrc p15, 0, r0, c1, c0, 0
    ldr r1, =0x0005707D
    orr r0, r0, r1
    mcr p15, 0, r0, c1, c0, 0

    bx lr
Emulator setup
With a basic working binary and project skeleton ready, I can now run my rom. Whilst there’s
nothing stopping this from working on real hardware, it’s a bit more difficult to attach a
debugger to my O3DS so I’m going to use an emulator for nearly everything and only test the
final products on my 3DS.
Editor’s note!
This is a lie. I don’t know where my 3DS charger is so I can’t test it on real hardware yet.
For debugging purposes, I need an emulator with a debugger. There’s a handful of options
available:
-
NO$GBA was the first Nitro emulator, and technically has a debugger. In practice it
either doesn’t work or I just can’t figure out how to make it work beyond showing a
memory dump.It’s also proprietary and requires running via Wine.
-
DeSmuME (when built with
USE="gdb") has a GDB stub, but it was a bit buggy
the last time I used it. It also allegedly has a “View IO Registers” function, but it’s
permanently greyed out. -
melonDS, as of sometime in the last two years, has a GDB stub (which didn’t work until
sometime in the last few months) but no other debugging info. -
dust has full debugging features and a
GDB stub, which seems perfect! But… it locks up when attaching GDB, and the registers
are full of junk, so it’s not really suitable for step-by-step debugging.
I’ll use a mixture of melonDS and DeSmuME for this as the GDB stub in both does work but melonDS
has some odd behaviours on halting that make it a bit more inconvenient. For ease of debugging,
I’ll un-discard the missing debug sections in the linker script:
    __text_end = .;

-   /* Let's get rid of anything we haven't explicitly specified. This includes some debugging
-      info for now. */
-   /*/DISCARD/ : { * }*/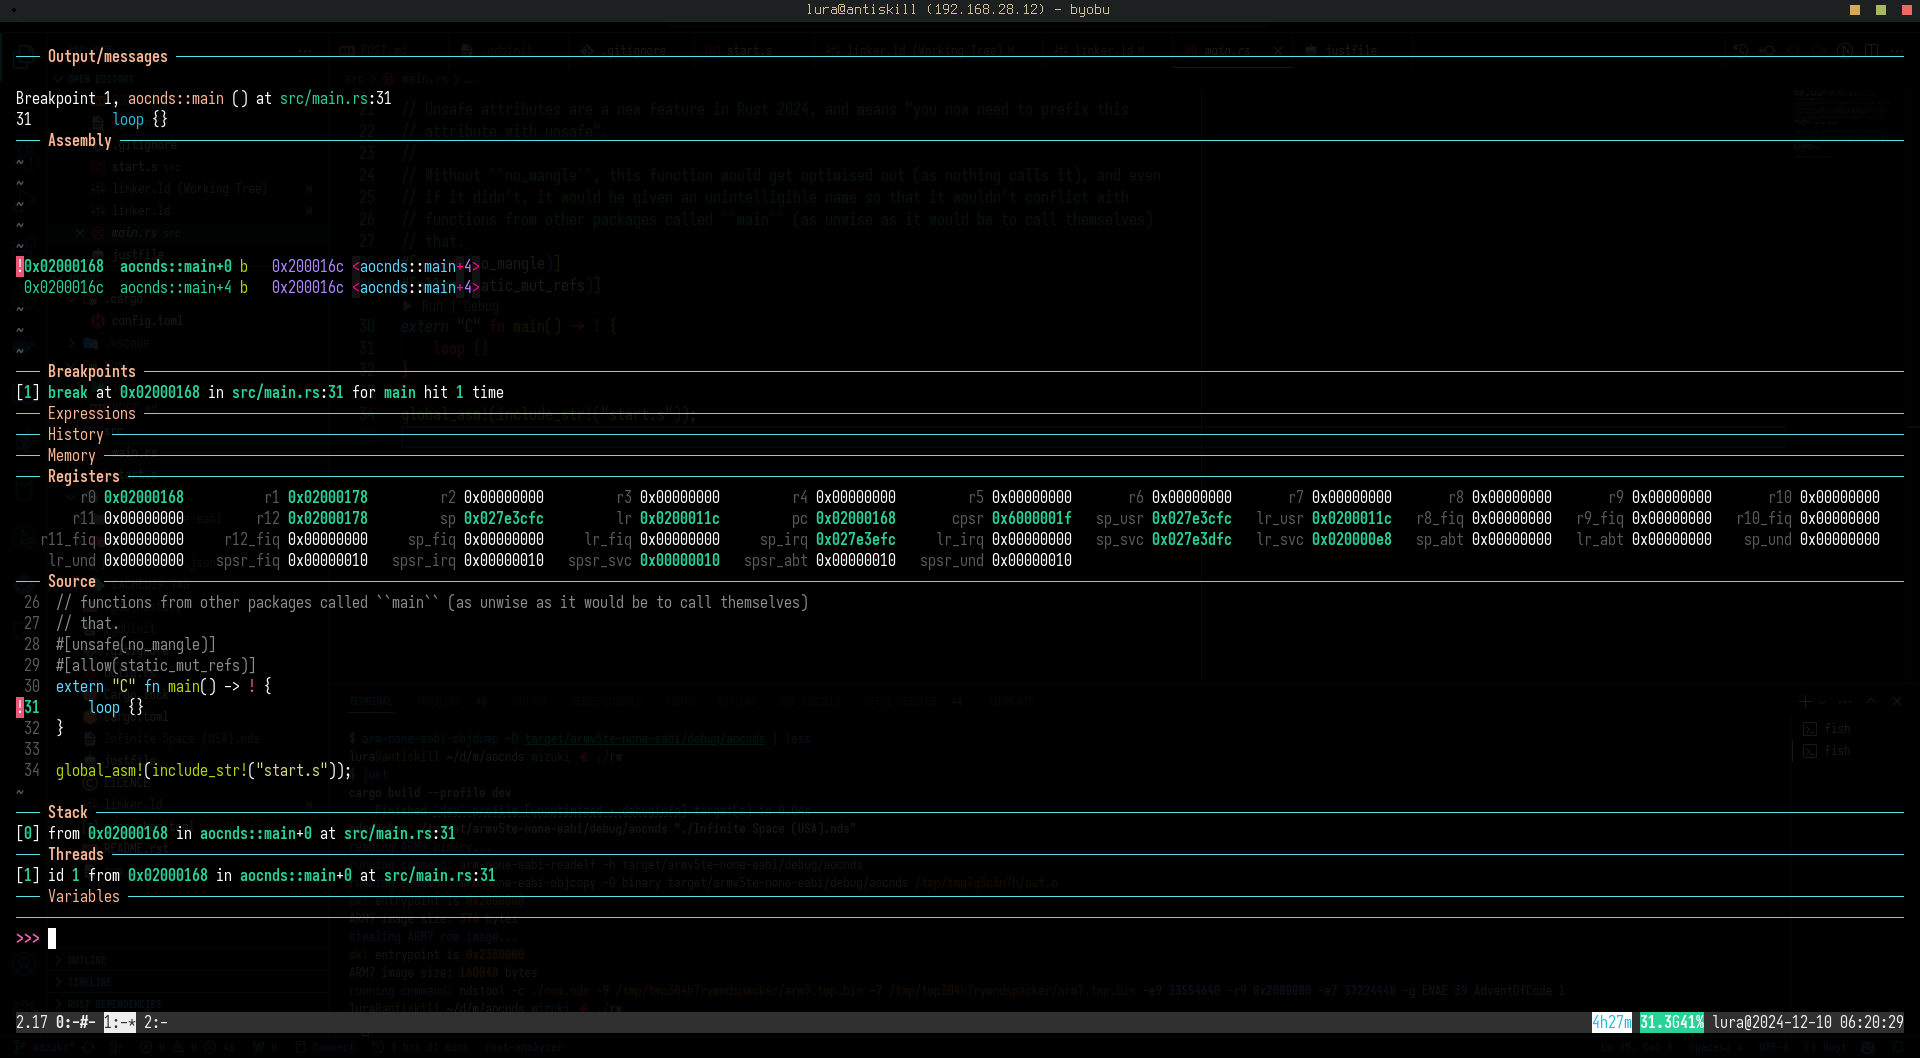
I enable the GDB stub in melonDS (Config -> Emu Settings -> Devtools, enable GDB stub,
check Break on startup), load my rom with melonDS rom.nds, then start my
cross-compiled GDB with env RUST_GDB=arm-none-eabi-gdb rust-gdb. I can load the
original ELF executable with file ./target/armv5te-none-eabi/debug/aocnds, then
connect to the GDB stub with target remote 127.0.0.1:3333. From there, it’s just
like using GDB normally.
I’m using the GDB dashboard for a
prettier GDB output.
Getting it to work, pt 1
In a strict sense, a working bootstrap script and a payload is nearly all that’s needed. I could
solve the problem now and “output” it to a known fixed memory address, which can be read in the
debugger, code golf style. Let’s do that now, and get the boring work out of the way.
Rust’s standard library is actually several separate libraries glued together:
-
The
corelibrary contains… well, the core code for the language. Pointer
types, the&strtype, panic logic, the core formatting logic, and other
core language traits are all defined in this library. -
The
alloclibrary contains things that allocate memory onto the heap. These
are types such as Box (heap pointers), Vec (heap arrays), and the reference counting
utilities. -
The
stdlibrary re-exports all of the former two libraries under the
stdnamespace (see:std::boxed::Boxedis actually an
alloc::boxed::Boxin disguise) and contains things that allow interacting
with the running system, such as filesystem or network I/O.
In a normal, hosted environment Rust uses the operating system’s memory management functions
(malloc() to allocate a block, free() to deallocate a block) to handle
the heap, wrapped in internal tracking code. In this no_std environment, there are
no operating system memory management functions, and I need to provide my own. Instead of
writing the tracking code, I’ll use a pre-built one known as talc. I’ll also add
the spin library as well:
[dependencies]
spin = { version = "=0.9.8" }
talc = { version = "=4.4.2" }
Next, I can update my main.rs to create a new global allocator:
use talc::{ErrOnOom, Talc, Talck};

// Normally cargo links in all external libraries manually if using Rust 2018 or later, with one
// exception: ``alloc`` on no_std targets. It needs to be explicitly provided using ``extern crate``.
extern crate alloc;

#[global_allocator]
static ALLOCATOR: Talck<:mutex>, ErrOnOom> = Talc::new(ErrOnOom).lock();
The global allocator is a Rust-ism that means “the implementation of malloc()”. Changing it
is like hooking malloc and free in C/++ code.The alternative is local allocators via the allocator API, a bootleg mechanism to allow
certain stdlib structures to use an explicitly provided allocator. Like most Rust features,
it’s currently unstable and that’s not likely to change for the foreseeable future.
Finally, I’ll update the config.toml to build alloc as well:
[unstable]
build-std = ["core", "alloc"]
This doesn’t work yet because I haven’t told the allocator where to start allocating things.
Nevertheless, I like to compile things like this early because modern IDEs are terrible at
actually showing errors:
error: could not compile `spin` (lib) due to 14 previous errorsAh.
A Multithreaded World
In the programming world, there are two approaches to making multithreaded code safe:
- Fuck you. This model is used by C/++, amongst others.
-
Make it annoying (if correct) to use multithreaded code. This is the approach Rust uses, and
by technicality pre-Python 3.13.
In order to do anything with multiple threads in Rust, you need a set of operations known as
atomic operations. There is a lot to be written about a safe model of
multithreading, up to and including academic papers, but the gist of it is that atomic
operations are used to perform safe, multi-threaded synchronisation and communication. For
example, a compare-and-swap operation will compare the current value with a provided
value, and if it matches, swap it with a different one. This means that to all threads, that
value is only set if it matches, whereas a regular comparison and assignment might
allow another thread to change the value between the two operations.
On most architectures, such as x86_64 and AArch64, Rust provides a set of functions in the
core library that directly map to hardware instructions or features that perform
these operations. The ARM v5 architecture does not have these operations – it doesn’t even have
threads. When I try and compile the spin library, which relies heavily on atomics,
it fails due to missing all of those atomic operations for this platform.
Luckily, there is a library that fills in the missing atomic operations:
portable-atomic. Even luckier is that spin supports the usage of portable-atomic!
Even luckier still is that portable-atomic has support for working safely using the
critical-section library.
Warning!
Upon reading the above, some incredibly-credibly smart person has gone: but wait! There’s no
threads on ARMv5! You don’t need to pull in a lock library because there will only ever be
one thing asking for the lock!To which, I will respond:
- I don’t care.
- Even without threads, I still need to implement atomics due to interrupts.
- The compiler complains really hard if I access static mutable variables.
Trivia!
A “critical section” is a global per-process lock.
portable-atomicwill enter the critical section before every “atomic” call and
exit it afterwards, achieving atomic behaviour even in the presence of interrupts.
Rust-level Runtimes
First, I’ll add the new dependencies and features to Cargo.toml:
[dependencies]
+spin = { version = "=0.9.8", features = ["portable-atomic"] }
talc = { version = "=4.4.2" }
+portable-atomic = { version = "=1.10.0", default-features = false, features = ["critical-section"] }
+critical-section = { version = "=1.2.0", features = ["restore-state-u32"] }
As this requires some extra code, I’m going to separate this out into its own file and include
some of my previous runtime helpers such as the panic handler and the allocator instance:
// File: runtime.rs
use talc::{ErrOnOom, Talc, Talck};

#[panic_handler]
fn _handle_panic(_: &core::panic::PanicInfo) -> ! {
    // TODO: Do something better than this
    loop {}
}

#[global_allocator]
static ALLOCATOR: Talck<:mutex>, ErrOnOom> = Talc::new(ErrOnOom).lock();

// File: main.rs
mod runtime;
Next, I need to provide an “implementation” of my critical section for the library:
struct NitroCriticalSection;

unsafe impl critical_section::Impl for NitroCriticalSection {
    unsafe fn acquire() -> critical_section::RawRestoreState {
        todo!()
    }

    unsafe fn release(restore_state: critical_section::RawRestoreState) {
        todo!()
    }
}

critical_section::set_impl!(NitroCriticalSection);
This so-called implementation doesn’t do anything yet, but it does let me build…
= note: arm-none-eabi-ld: warning: /home/lura/dev/misc/aocnds/target/armv5te-none-eabi/debug/deps/aocnds-e996ce57e42739ae has a LOAD segment with RWX permissions
        arm-none-eabi-ld: /home/lura/dev/misc/aocnds/target/armv5te-none-eabi/debug/deps/aocnds-e996ce57e42739ae.9kjzfmijbuatij09ciw83phbt.rcgu.o:(.ARM.exidx.text.__rust_alloc_error_handler+0x0): undefined reference to `__aeabi_unwind_cpp_pr0'
I’m not really sure why the allocation error handler is emitting calls to the C++ exception
unwinding function instead of going through panic machinery, but I’ll provide some stub
implementations anyway:
#[unsafe(no_mangle)]
pub fn __aeabi_unwind_cpp_pr0() -> ! {
    loop {}
}

#[unsafe(no_mangle)]
pub fn __aeabi_unwind_cpp_pr1() -> ! {
    loop {}
}

#[unsafe(no_mangle)]
pub fn __aeabi_unwind_cpp_pr2() -> ! {
    loop {}
}
Even the Linux kernel
has these stubbed out. Thanks, binutils?
Whilst this does build, this will immediately panic when attempting to allocate memory as the
critical sections are stubs that don’t do anything. I need to actually write a critical section
handler.
Memory-mapped I/O
The critical section needs to disable the Interrupt Master Enable register before entering, and
then disable it again afterwards.
Not to be confused with the “Disable interrupts” flag on the Current Processor State register in
the ARM architecture, obviously. I don’t know why there’s two, but one added explicitly by
Nintendo seems more legit.
The IME is an example of memory-mapped I/O; hardware that is controlled by writing to
specific memory addresses in the address space of the program. A lot of systems use
memory-mapped I/O for hardware control; whilst modern x86 computers started out using
port-mapped I/O (which uses special instructions and a separate memory space) AMD64 has
moved to using memory-mapped I/O for modern peripherals. These special addresses are treated
just like any other memory when reading or writing from them – although not all addresses are
actually readable or writeable, and some will only allow reading or writing specific bits of the
value.
When I wrote the CRT for the program, the first thing I did was set the IME to zero. In
assembly, this is easy enough; a
str [
instruction just sets
Address := Input. Reading or writing from arbitrary memory addresses in bare Rust
may cause everything ever to violently explode, so I’m going to use a wrapper library called
voladdress, which is not-so-coincidentally used by the GBA wrapper library.
For more information why this may cause everything ever to violently explode, see
this excellent post. The most notable
thing is that LLVM can just elide subsequent writes to an address, which is fine for normal
memory but extremely wrong for memory-mapped I/O where writing has side effects.
use voladdress::{Safe, VolAddress};

// Whilst only the lower bit is used, this isn't a boolean because representing non-0 or 1 as
// a boolean is UB.
static REG_IME: VolAddress =
    unsafe { VolAddress::new(0x4000208) };

unsafe impl critical_section::Impl for NitroCriticalSection {
    unsafe fn acquire() -> critical_section::RawRestoreState {
        // Read it off first so that it can be restored properly. If the previous value was zero,
        // we need the restore to remain zero!
        let prev = REG_IME.read();
        REG_IME.write(0);
        return prev;
    }

    unsafe fn release(restore_state: critical_section::RawRestoreState) {
        REG_IME.write(restore_state);
    }
}
Whilst the memory allocator will still crash (because I haven’t given it anywhere to
take memory from), at least it won’t crash due to the lack of atomics.
The heap, for real
In my linker script above, I defined a symbol called __text_end, which marks where
the program code ends. This will be the start of my heap. I can define the end of the heap with
__memory_end = ORIGIN(main_ram) + LENGTH(main_ram) - LENGTH(dtcm) - 4;. Combined,
this will let me tell the allocator “okay, this is where you can use memory”.
Linker script variables (when exposed to higher level code) aren’t really variables in the
traditional sense: they’re addresses. Global variables require space to be allocated in the
datasections, whereas linker variables don’t get that. To get the value of a
linker variable, I have to get the address of it. It’s a bit confusing.
Warning!
The
- LENGTH(dtcm)is very important! Thetalcallocator stores
metadata at the very end of memory, growing downwards. The stack exists at the very
end of memory (in the DTCM), growing downwards. When the stack overwrites the metadata
stored by the allocator, the next allocation call will check the previous metadata, see that
it’s all messed up, and panic.
// File: runtime.rs
use talc::Span;

unsafe extern "C" {
    static mut __text_end: u8;
    static mut __memory_end: u8;
}

/**
 * Sets up the heap allocator with the memory span defined by the linker.
 */
#[allow(static_mut_refs)]
pub fn setup_heap_allocator() {
    // Evil linker incantations!
    unsafe {
        let text_end = &mut __text_end as *mut u8;
        let memory_end = &mut __memory_end as *mut u8;
        let span = Span::new(text_end, memory_end);
        ALLOCATOR.lock().claim(span).unwrap();
    }
}

// File: main.rs
extern "C" fn main() -> ! {
    setup_heap_allocator();

    // ...
}
With this, I have a working heap that can allocate objects. The program binary size is ~81KiB
(all that heap tracking machinery doesn’t come cheap) or ~25KiB with -Os, which
leaves ~3.6MiB of heap space. That’s almost enough to run Windows 95.
Solving the problem
The actual implementation of Day 1 Part 1 is trivial. This is not a very fast (or good)
implementation, but it works. With no output, I’ll just write to the fixed address 0x02200000,
which is likely to be very past the end of the heap. I’ll also add a hardware breakpoint, which
will freeze GDB when it’s done (if running in melonDS).
// Outside main:
static PUZZLE_INPUT: &str = include_str!("day1.txt");

// Format of the file is XXXXX   XXXXX
let mut first: Vec = Vec::new();
let mut second: Vec = Vec::new();

for line in PUZZLE_INPUT.split_terminator('\n') {
    let first_num: u32 = line[0..5].parse().unwrap();
    let second_num: u32 = line[8..13].parse().unwrap();
    first.push(first_num);
    second.push(second_num);
}

first.sort();
second.sort();

let mut sum: u32 = 0;
for (first, second) in first.iter().zip(second) {
    let diff = ((*first as i32) - (second as i32)).abs();
    sum += diff as u32;
}

let output: VolAddress = unsafe { VolAddress::new(0x02200000) };
output.write(sum);

unsafe {
    asm!("bkpt");
}
Running this in GDB and checking memory at the breakpoint gives me my final answer:
>>> x/d 0x02200000
0x2200000:      2344935
Plugging it into the Advent of Code website verifies the solution is correct.
Doing it in a less lame way
Only having output under the debugger is lame. Nitro has two screens that I’m not
using!
Nitro’s graphics system is two GBAs, one per screen, and a 3D engine outputting to one screen. I
don’t need the 3D engine and I don’t need the second screen, so I only need to program one of
the GBAs (engine A).
“2D Engine” is a Nintendo-ism for “graphics chip”. It’s a programmable way of doing 2D
graphics per screen. Imagine it like a hardware game engine, same for the 3D engine.
Trivia!
Most Nitro games are fine with having 3D on one screen only; see Mario Kart DS as an
example, where the top screen is the 3D game and the bottom screen is a 2D map. But some
games managed to achieve 3D by a combination of two techniques:
Swapping which engine outputs to which screen every other frame. Frame 1 has engine
A outputting to the main screen, and frame 2 has engine B outputting to the main
screen.Using the display capture feature to capture the previous 3D frame and
having engine B display it. This way Nitro games got 3D graphics on both screens, at
the penalty of only being able to run at 30FPS.
Interrupts & Vertical Sync
There’s always some bureaucracy to do first. Whilst displays and screens can be thought of as
just a 2D array of pixels, there’s some intricacy in how these pixels are drawn. Historically,
for Cathode Ray screens, the electron gun would physically move left to right until it hit the
edge of the screen and it would have to reposition itself back to the left and go down one line.
This is known as a scanline. When it reached the bottom of the screen it would then
have to move the electron gun back to the top left and continue.
The periods between moving the gun to the left and moving the gun to the top were known as the
horizontal blank and vertical blank respectively. The horizontal blank isn’t
very useful but the vertical blank is very useful: it’s the point where the game should
update all of its graphics. This is because the display is a live view of the current
graphical settings, and updating things whilst the screen is currently drawing results in
graphical artefacts known as tearing. The behaviour of waiting for the vertical blank to draw is
known as vertical sync. There are two ways to wait until vertical blank:
-
Wait until the VCOUNT register is past 160. Nitro’s screen resolution is 256×160, so
when the VCOUNT is above this the Nitro is in the vertical blank period.This has the problem that this spends all of its time spinning the CPU whilst waiting
for the next frame. -
Ask the CPU to suspend until the next vertical blank interrupt. An interrupt is
exactly what it sounds like; a mechanism for hardware to interrupt the currently running
code and force it to deal with something else. (In this case, the hardware is the LCD
controller.)
The latter is absolutely the correct approach, but that means dealing with a bunch of interrupt
control code.
The IRQ handler
The Nitro BIOS is a small (3KB) binary built-in to the hardware of the console. It’s responsible
for actually dealing with interrupts, as it is mapped to where the hardcoded ARM9 interrupt
handlers are. When an interrupt happens, the ARM core switches mode into IRQ mode, and then
jumps to the IRQ vector in the BIOS code.
For embedded systems, vectors are a set of instructions at the very start of a memory region
that are used for running the code upon boot or reset, for interrupts, or for exceptions.
These are all jump opcodes to an actual function that does the work; for example, the reset
vector for Nitro is located at0xffff0000, and is a single instruction that
does a jump to0xffff0110which is the actual bring-up code for the system.The ARM9 has eight of these: Reset, Undefined, Supervisor Call, Prefetch Abort, Data Abort,
Unused, Interrupt, and Fast Interrupt. On Nitro, only Reset, Supervisor Call, and Interrupt
have assigned functions; the rest all share the vector for Fast Interrupt which is used for
hardware debugging.If you see the word IRQ, that’s the same as “interrupt”.
Here’s the function in the BIOS responsible for handling interrupts, annotated by me:
// Save registers used by user code
// The other registers are saved by the IRQ function in its prologue and epilogue.
stmdb      sp!,{r0,r1,r2,r3,r12,lr}
// Load DTCM address (shifting off lower bits)
mrc        p15,0x0,r0,cr9,cr1,0x0
mov        r0,r0, lsr #0xc
mov        r0,r0, lsl #0xc
// Add fixed offset to the DTCM for the IRQ handler address
add        r0,r0,#0x4000
// Load BIOS return address
adr        lr,0xffff0290
// Jump to IRQ handler
ldr        pc,[r0,#-0x4]
// Restore registers used by user code
ldmia      sp!,{r0,r1,r2,r3,r12,lr}=>local_18
// Jump back to previous code
subs       pc,lr,#0x4
subs pc, lr, #0x4is a magic instruction that tells the ARM9 to switch from IRQ
mode back to the previous mode. It returns to the code that was previously interrupted.
Summarising this, the address of my interrupt handler needs to be at the address of
DTCM + 0x3ffc. I’ll put the code to load this into the start.s file, to avoid even
more Rust-level linker script incantations:
+   // Less of a minefield to just set the IRQ handler in ``_start``
+   ldr r0, =irq_handler
+   ldr r1, =__dtcm_region_end
+   str r0, [r1]

    // After all of our setup is done, we can finally switch to main.
The BIOS takes care of the busywork, so my interrupt handler can be a regular Rust function with
the regular C calling convention:
// File: interrupts.rs
#[unsafe(no_mangle)]
pub extern "C" fn handle_irq() {
    todo!()
}
Right now, interrupts are entirely disabled because the Interrupt Master Enable register is
unset; even if it wasn’t, there’s another two registers I need to set to actually enable
interrupts: the Interrupt Enable register (that’s right, there’s two) and the Display Status
register. The Interrupt Enable register is a bitfield of the enabled interrupt types, with bit 0
being vertical blank interrupts. I’ll write a middleware function to handle setting IME and IE:
// File: interrupts.rs
pub static REG_IME: VolAddress =
    unsafe { VolAddress::new(0x4000208) };

static REG_IE: VolAddress =
    unsafe { VolAddress::new(0x4000210) };

/**
 * Waits for the next interrupt, based on the provided mask.
 */
pub fn wait_for_interrupt(mask: u32) {
    let old_mask = REG_IE.read();

    REG_IE.write(mask);
    // enable global interrupts
    REG_IME.write(1);

    todo!("Actually halt the processor!")

    REG_IME.write(0);
    REG_IE.write(old_mask);
}
I’ll write a second wrapper function that sets DISPSTAT and then calls the
wait_for_interrupt function as above:
/**
 * Waits for the next vertical blank interrupt.
 */
pub fn wait_for_vblank() {
    let old_disp_stat = REG_DISPSTAT.read();
    // Bit 3 of DISPSTAT enables vertical blank interrupts
    let new_disp_stat = old_disp_stat | 0b100;

    REG_DISPSTAT.write(new_disp_stat);
    wait_for_interrupt(0b1);
    REG_DISPSTAT.write(old_disp_stat);
}
Finally, I need to fill in the code that actually halts the system. The easiest way is
to delegate it to the BIOS with an SWI (Software Interrupt) instruction; this will jump into the
BIOS and call Software Interrupt #0x06 which is the interrupt for Halt.
.section .text

// See the definitions in ``supervisor.rs`` for more information.
//
// GBATEK says:
// Caution: When invoking SWIs from inside of ARM state specify SWI NN*10000h, instead of
// SWI NN as in THUMB state.

.global SWI_Halt
SWI_Halt:
    swi #0x60000
    bx lr
I’ll replace the todo!() in the interrupt waiter with
unsafe { SWI_Halt() }. The last thing to do is to acknowledge the
interrupt by setting the same bit in the Interrupt Flags register (at 0x4000202) as
well as the bits at the fixed address DTCM + 3FFCh, which is done by another assembly function.
#[unsafe(no_mangle)]
pub extern "C" fn irq_handler() {
    let mask = REG_IF.read();
    if mask & 0b1 == 0 {
        // don't care
        return
    }

    // clear V-blank bit
    REG_IF.write(0b1);
    unsafe {
        _set_irq_flags(0b1);
    }
}
Editor’s note!
As it turns out, none of that was needed because the next section doesn’t care about
interrupts. Oh well. It’s still good to have for the future, and to lower power usage by
explicitly halting instead of spinning.
Drawing to the screen
Nitro has a very configurable graphics system based around backgrounds and
sprites (known as objects internally) each with various configurable modes. It
also has an impressive ~650KiB of video memory (you could run Wing Commander: Privateer on
that!) configurable into various blocks.
The logical way to output the solution for the AoC problem is to create sprites for every digit,
upload them to video memory, and arrange the sprites on screen. I’m not going to do that and
instead I will use Display Mode 2, one of the four display modes for Engine A:
- Mode 0: Screen off
- Mode 1: Normal graphics mode, with backgrounds and objects
- Mode 2: Framebuffer mode, using video RAM
- Mode 3: Framebuffer mode, using DMA from main memory
Mode 2 lets me treat the entire of VRAM Bank A as a framebuffer of 16-bit BGR555 pixels.
A framebuffer is a block of memory treated as a raw bitmap which is drawn upon to make a
final frame. The framebuffer is copied to the output device (in my case, the LCD) and
presented to the user. This is how graphics was done in the olden days, with code writing
directly to the framebuffer.On modern graphics cards, the framebuffer is handled internally by the GPU and commands are
instead sent to efficiently draw to it, rather than having the user code drawing directly to
the framebuffer.
The 650KiB of video memory is separated into multiple configurable banks which changes
address in the VRAM area of memory depending on its configuration. Each VRAM bank has a
register for controlling it’s mode (three bits) and offset (two bits), as well as if it is
enabled or not.Framebuffer mode and capture mode can use one of the first four banks, so for simplicity I
will just use the first bank, which is 128KiB and is mapped at0x6800000
in mode zero. This is more than enough to fit the entire framebuffer into the screen.
I’m going to be using the
embedded_graphics
library for drawing things on the screen, as it saves a lot of effort writing the individual
primitives. First, I need a framebuffer implementation:
pub struct LcdFramebuffer {
    vram: VolBlock,
}

impl LcdFramebuffer {
    pub fn new() -> LcdFramebuffer {
        let vram = unsafe { voladdress::VolBlock::new(0x6800000) };
        return LcdFramebuffer { vram };
    }
}

impl OriginDimensions for LcdFramebuffer {
    fn size(&self) -> embedded_graphics::prelude::Size {
        return Size::new(256, 192);
    }
}

impl DrawTarget for LcdFramebuffer {
    type Color = Bgr555;
    type Error = core::convert::Infallible;

    fn draw_iter>>(
        &mut self,
        pixels: I,
    ) -> Result<(), Self::Error> {
        let bound = self.size();

        for Pixel(coord, colour) in pixels {
            if coord.x < 0 || coord.x > bound.width as i32 {
                continue;
            }

            if coord.y < 0 || coord.y > bound.height as i32 {
                continue;
            }

            let pos = coord.x + (coord.y * 256);
            let offset = self.vram.index(pos as usize);
            offset.write(colour.into_storage());
        }

        return Ok(());
    }
}
Next, I can enable VRAM Bank A by sitting bit 7 (enable) of the VRAMCTL_A in my main:
VRAMCTL_A.write(0b10000000);
Display mode is controlled by bits 16-17 of the DISPCNT_A register (Display Control for Engine
A). I’ll set that to Mode 2 like so:
let mut dispcnt = DISPCNT_A.read();
let bits = 2u32 << 16;
dispcnt |= bits;
DISPCNT_A.write(dispcnt);
Warning!
GBATEK notes that bit 7 of DISPCNT enabled forced blanking, turning the screen white and
enabling faster access to VRAM. In all the emulators I tested, this does not
work in framebuffer mode.
Finally, I can draw the trademark OpenGL triangle with a Triangle primitive:
let mut lcd = LcdFramebuffer::new();
let tri = Triangle::new(Point::new(10, 10), Point::new(100, 10), Point::new(10, 100))
    .into_styled(PrimitiveStyle::with_fill(Bgr555::new(31, 0, 0)));
tri.draw(&mut lcd).unwrap();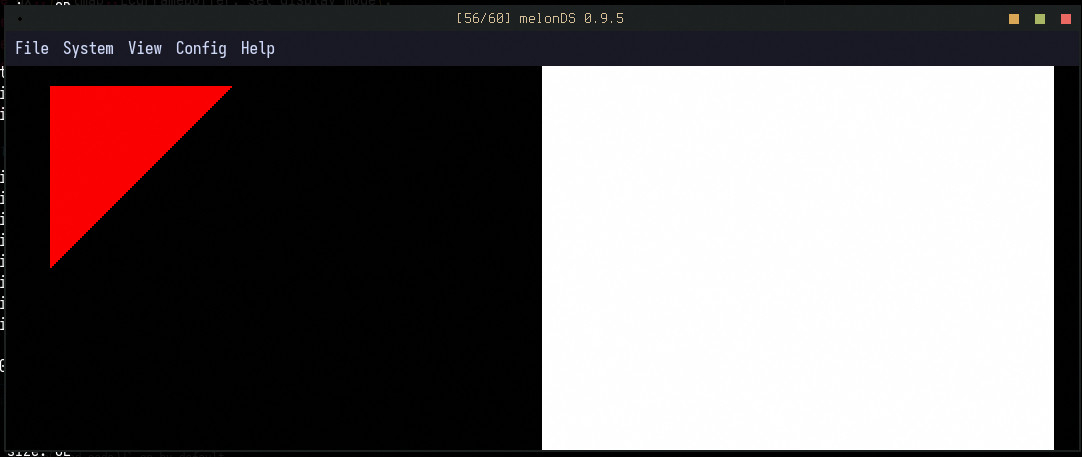
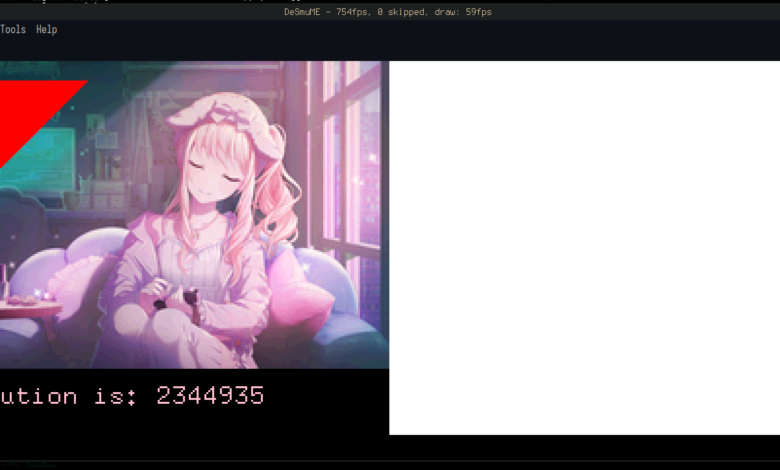
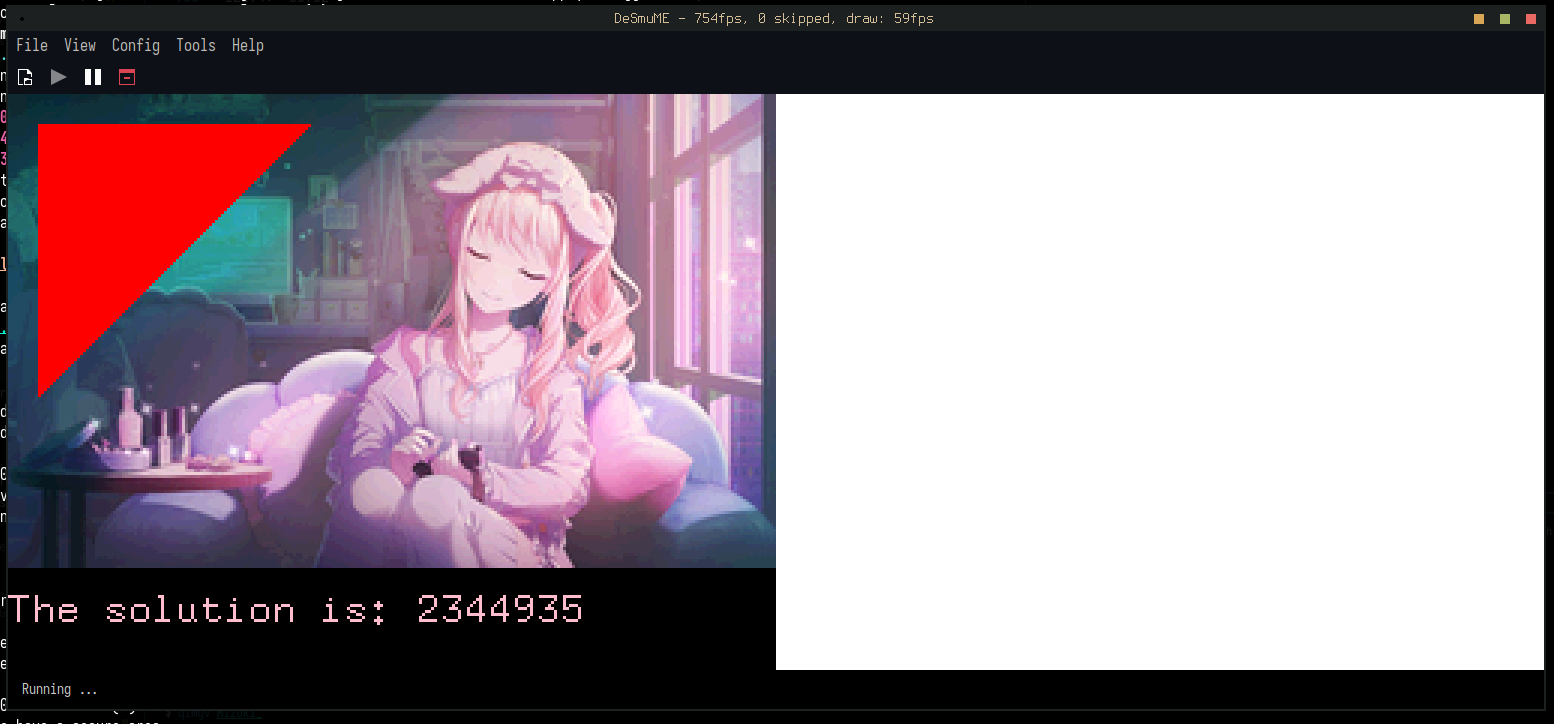
Unfortunately, upon seeing this I immediately became overwhelmed with evil power and used the
tinybmp library to pull in an image and
some text:
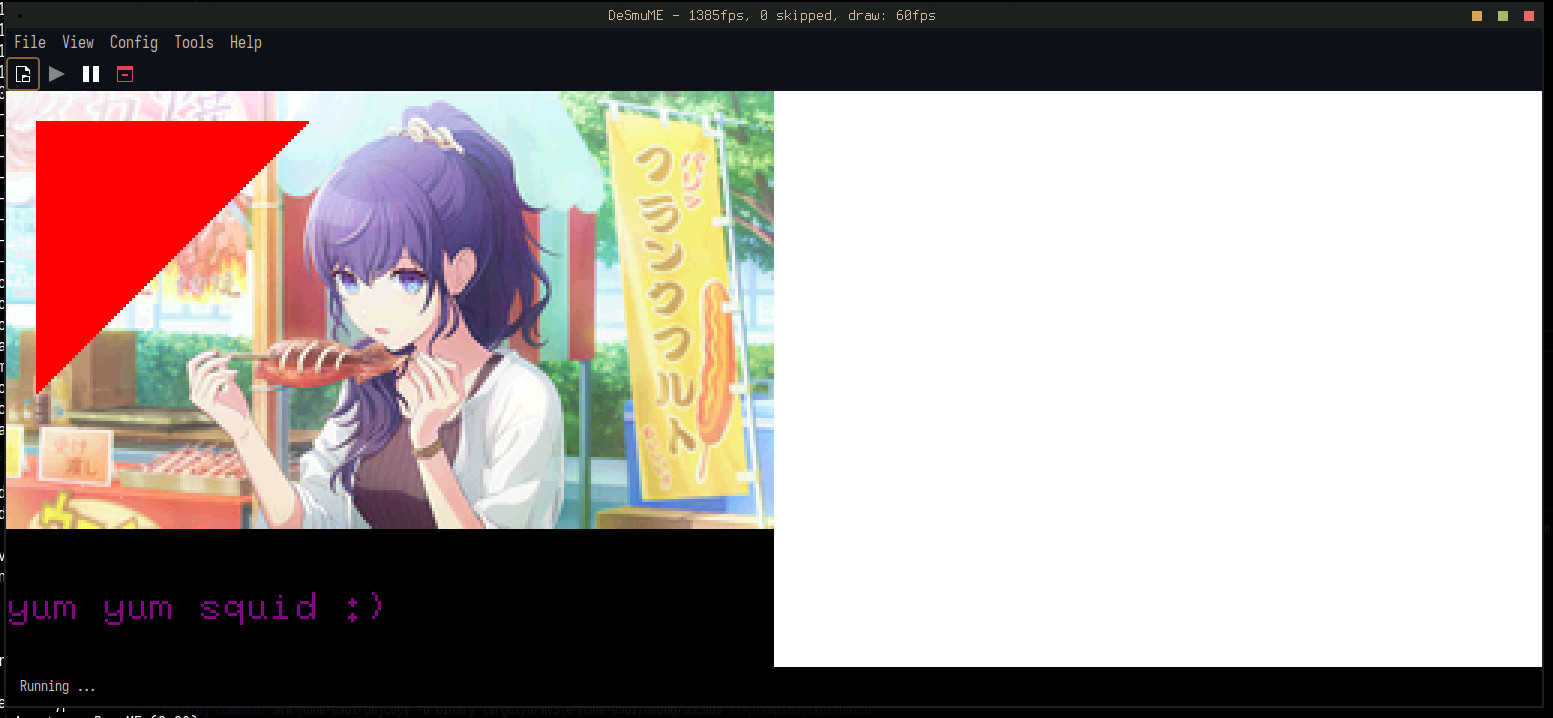
The overhead of the inefficient debug code makes this comically slow. It takes about 20
seconds for everything to be fully drawn at 60fps, because moving from main memory to video
memory byte-by-byte is very sluggish.The right way to do this – without even optimising the inner loop – would be to draw to an
in-memory framebuffer, then use a DMA
transfer to copy into VRAM significantly faster; and, only after doing that, turn on the
screen. At least it’s fast enough in release mode.
The final step is to actually hook up the Advent of Code solution to the font:
Text::new(
    format!("The solution is: {}", solve_aoc2021_pt1()).as_str(),
    Point::new(0, 175),
    font,
)
.draw(&mut lcd)
.unwrap();
Conclusion
This is a bit of a bootleg solution. The puzzle input is hardcoded into the program text which
cuts in to precious memory; if I wanted to do more of the puzzles, I’d have to either hardcode
them as well into memory (which takes up even more memory) or read them from the cart (which is
an involved process). I’d also need to add the ability to select the solution, which would
require input, which requires writing code onto the ARM7 because the ARM9 doesn’t get to know
input.
But those are all topics for another day, because this post is already very long and
implementing more complex features such as cart transfers or extended graphics is an entire
entry’s worth of detail in itself. So, I’ll leave it at this.
The final thing to say is that this project was disappointingly easy. It took me about two weeks
to implement, working on and off, and most of it Just Worked; I only had to debug maybe two or
three things. Hopefully extending this into a proper SDK will be harder.

